My estuary & coastal waters fly box
{{start}}
Salt water fly tying has progressed a long way over the last 20 years or so and whilst old favorites like the crazy Charlie, baited breath and Clouse are featured in this fly box you will see that I have used quite contemporary materials to dress those flies in.
Also, in this fly box you will find my own recipes for a number of flies I have developed over the years to consistently target a range of species found in estuary and coastal waters around Australia.
{{end}}

{{+1}}Articulated swimmer – estuary species #2/0 version{{-1}}
{{start}}
This amazing estuary fly tied in Qantas colours of red and white or natural colours of olive and shrimp is like candy to many estuary species. This estuary version is tied on a size #2/0 hook with a 3/16" dumbbell eyes.{{end}}

{{+1}}Articulated baitfish – estuary version{{-1}}
{{start}}
Whilst not designed to represent any particular bait fish I have designed this fly to have a shape, form and function similar to many of the little fish that predators hunt.
This #2/0 estuary fly is 9 cm long and because it's unweighted it's relatively easy to cast. It's a great fly to use when targeting estuary species including but not limited to:
Bream (yellow tail, pikey and black bream)
Lutjanids (Mangrove Jack & Fingermark
Javelin fish (Barred Grunter and Silver Grunter)
Tarpon
Flathead (Dusky and Bartail)
Smaller trevally (including Giant Trevally and Golden Trevally)
Smaller queenfish
It can be used in a number of different ways including:
- As a prospecting fly work the fly over and past where fish are holding or are expected to hold and retrieve at a range of jerky retrieves at various speed and with the occasional stop.
- For sighted fish put in clean cast which is inside the fishers current swim path so when the fish sees the fly it will have to make a slight change of direction, instinctively taking it a little out of its comfort zone. The tendency of fish once they have made that change is to take the fly much quicker than they would had the fly been directly in their path. As soon as you think the fish is in range rip the fly in as fast as you can strip or roly poly. It's important to keep your line under control at all times as strikes are always hard and mostly followed by blistering runs and you have to be able to clear the stripped line and get the fight back on the reel as soon as possible.
- It can also be used as a trailing fly for my articulated popper combination that I use to target predators in very shallow water or actually feeding on the surface.
The fly below is dressed in Brown Bomber colours but I also like it dressed in Qantas colours or natural colours of olive and shrimp..

|
Materials for trailing hook
| Hook size | Thread | Body foundation |
|---|---|---|
| Mustard 34007 @#2/0 | Big fly thread - black | H2O slinky fiber - brown |
Process
Right from the start it's important to get an understanding how much body materials you will need to achieve the desired thickness and density of the fly.
There are 2 bunches of H2O Slinky Fiber and two bunches of Steve Farrar's Flash Blend and an optional one or two bunches of Flashabou or Flash Blend to be tied in and it can be a bit of a learning curve getting the quantities right. The goal is to use just enough body materials to dress the fly without making the fly too thick. I suggest you start with bunches as thick as a match stick or tooth pick and then go up or down from that for successive flies.
Also, because your going to fold the Slinky Fiber and the Flash Blend over on themselves it's important to tease each bunch of Slinky Fiber and Flash Blend out at the end that was cut off the hank so when it's tied in and doubled over the tips will all meld together and you don't finish up with square ridges of Flash Blend, from where it was cut from the hank, in the middle of the fly.
| A |
|
|
|---|
| B |
|
|
|---|
| C |
|
|
|---|
| D |
|
|
|---|
The second part for building an articulated fly is to attach the articulated shank and to dress that to represent the thorax and head of the fly.
Materials for articulated head
| Articulated shank | Thread | Structure guard (optional) | Under-body extension | Back | Back flash (Brown Bomber only) | Belly | Belly flash (Brown Bomber only) | Eyes |
|---|---|---|---|---|---|---|---|---|
| Fish Skull FS-GS-K20 20mm shank | Uni big fly thread - black | 50lb stiff monofilament | H2O slinky fibre - brown | Steve Farrar's flash blend - black | Flashabou - black | Steve Farrar's flash blend - orange | Flashabou - gold | Fish Scull Living Eyes Size 7 mm - ice colour |
| E |
|
|
|---|
| F |
|
|
|---|
| G |
|
|
|---|
| H |
|
|
|---|
| I |
|
|
|---|
| J |
|
|
|---|
| K |
|
|
|---|
| L |
|

|
|---|
| M |
|

|
|---|
| N |
|
|
|---|
| O |
|
|
|---|
| P |
|
|
|---|
| Q |
|
|
|---|
| R |
|

|
|---|
{{end}}

{{+1}}Chatto’s baitfish{{-1}}
{{start}}
I developed this fly to fish both the snaggy rock and coral waters but more recently have found a place for it when fishing the open blue waters and estuary waters of Central Queensland.{{end}}

{{+1}}Low snag fly – jelly prawn{{-1}}
{{start}}
I tie this fly on a #1 or #3/0 unweighted worm hook to which I add my own weight. Even though the natural jelly prawn is only about 4cm long versions bigger than that dont seem to worry bigger fish and I am guessing that they are more tuned into the colour, form and function of the oversized representation of a jelly prawn and see the bigger offering of protein as a bonus.{{end}}

{{+1}}Scrounger – articulated minnow{{-1}}
{{start}}
This is the third in my series of scrounger flies and like the scrounger baitfish and the scrounger jelly prawn it's tied on a worm hook which in soft plastic parlance is also referred to as a weedless hook and more often than not this fly can be retrieved not only through weed but also over or around most structure such as detritus matter, drowned timber, rocks etc, in rivers and lakes, without being snagged up.{{end}}
{{+1}}Low snag fly – baitfish{{-1}}
{{start}}
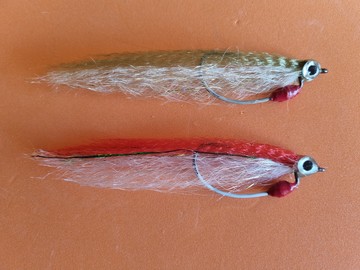
This fly can be cast onto a muddy bank, right into mangroves and onto rock bars and then can be retrieved over and through all manner of structure with an extremely low incidence of getting snagged up.{{end}}
{{+1}}Foam back prawn{{-1}}
{{start}}
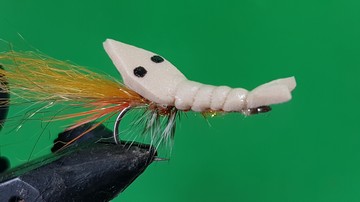
This fly is a floating version of my PET prawn fly and can be a real game changer and so much fun when estuary species, particularly bream and whiting, are feeding on the surface.{{end}}
{{+1}}Christmas Island special{{-1}}
{{start}}
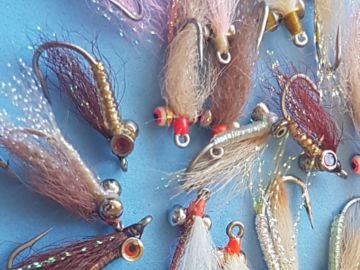
With just these seven colour each tied in two sizes and a couple of weights you will be ready for some fantastic bonefish sessions on the flats. Christmas Island Special in: Pink, Pearl, Orange – rich, Orange - light, Violet, Chartreuse & Yellow.{{end}}


